
UITableView总结
基本介绍
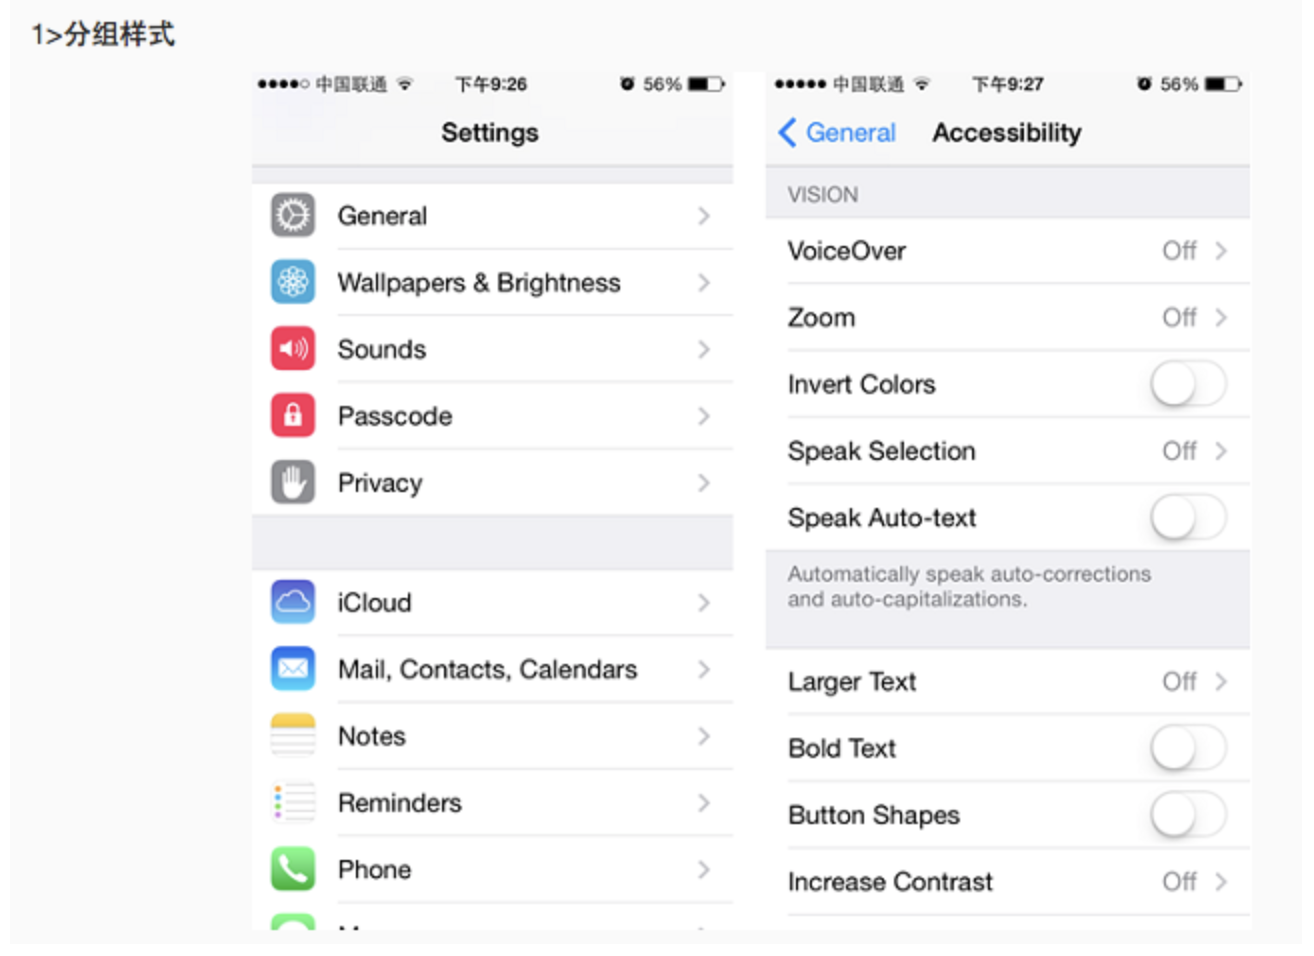
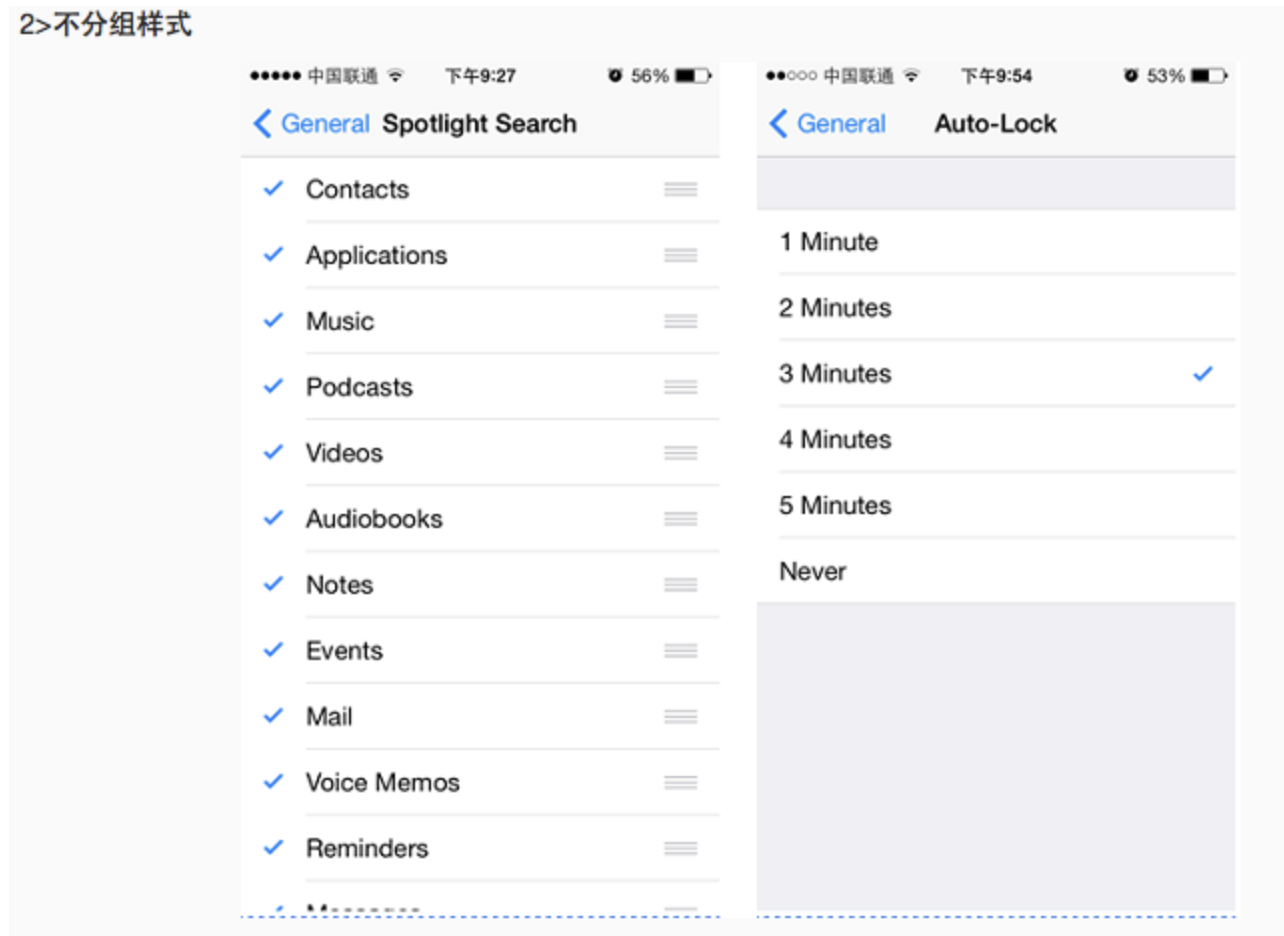
UITableView有两种风格:UITableViewStylePlain和UITableViewStyleGrouped。
UITableViewCellStyleDefault,
UITableViewCellStyleValue1,
UITableViewCellStyleValue2,
UITableViewCellStyleSubtitle
};
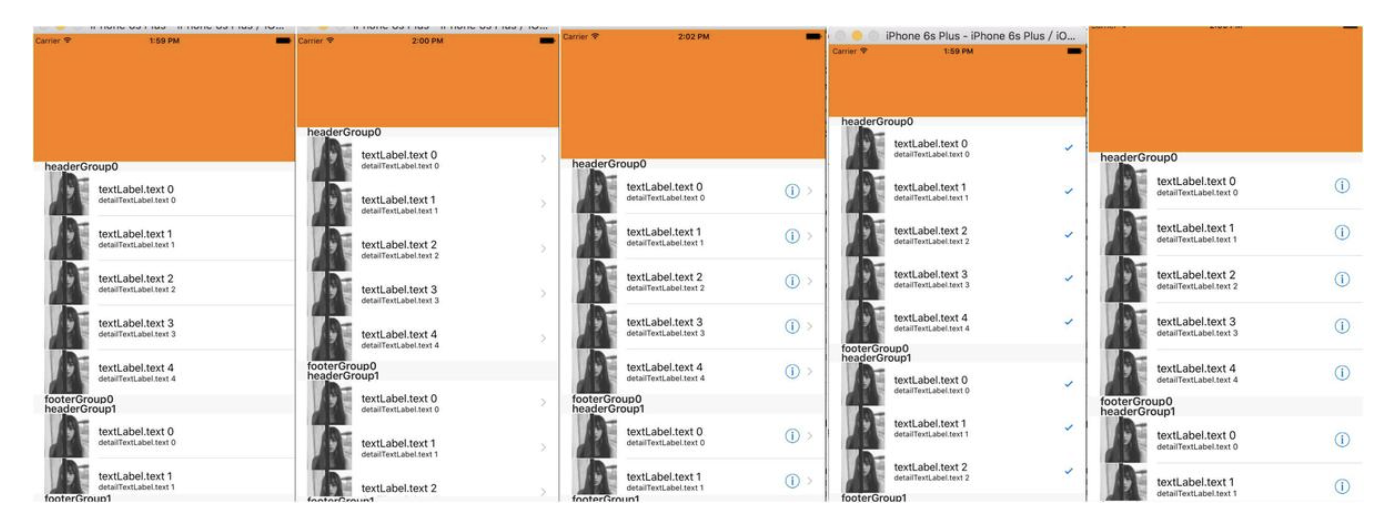
风格如下:
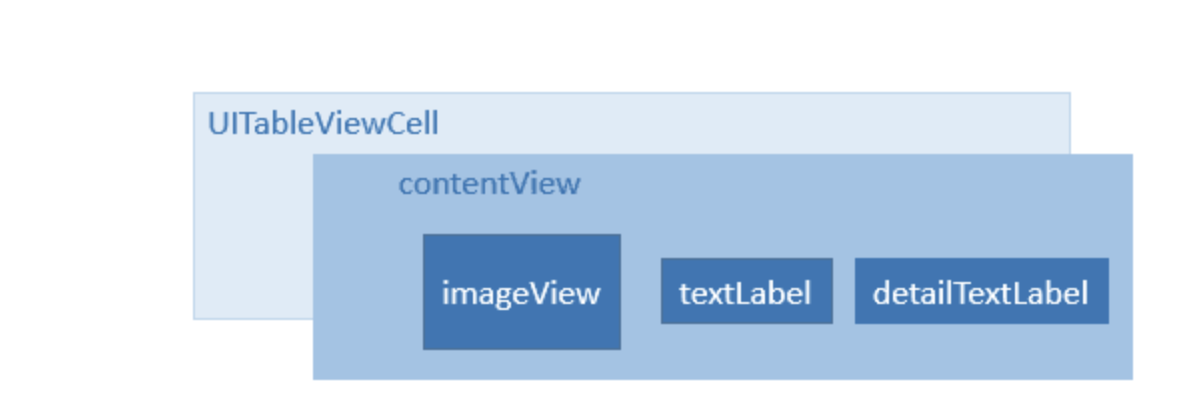
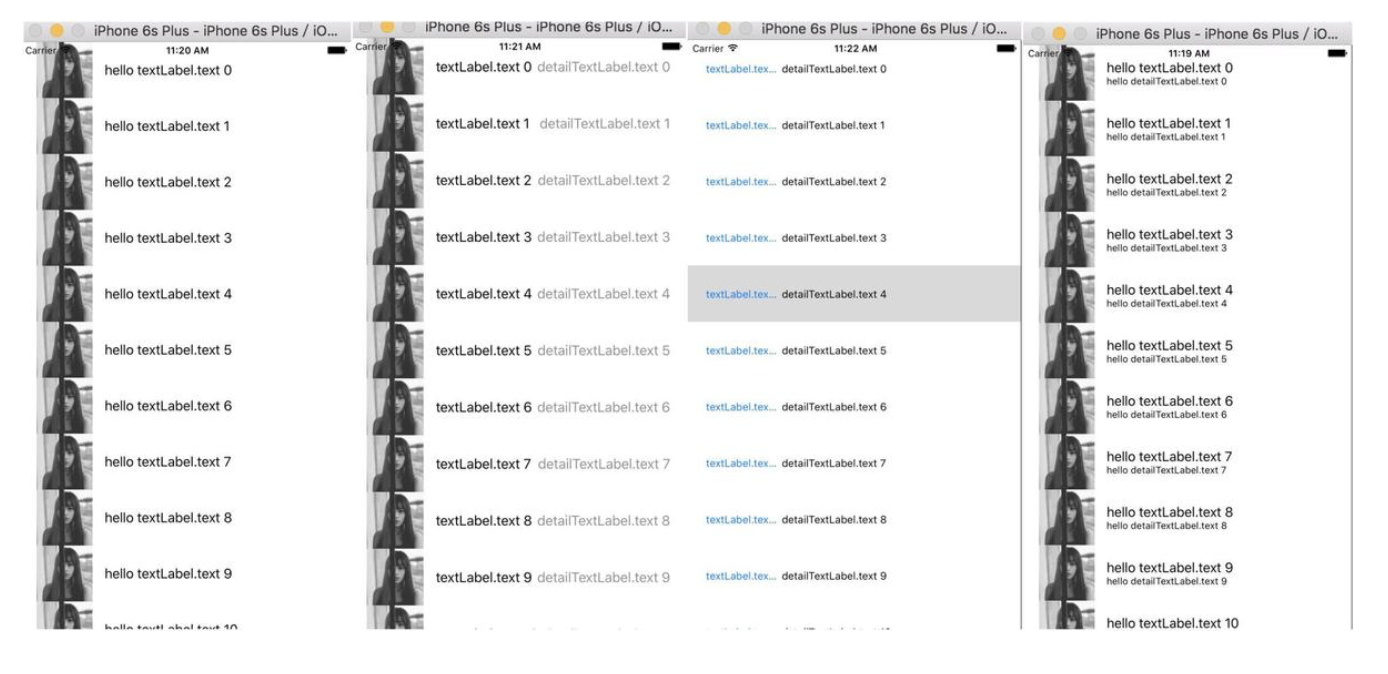
1⃣️左侧显示textLabel,不显示detailTextLabel,imageView可选(显示在最左边)
2⃣️左侧显示textLabel,右侧显示detailTextLabel,imageView可选(显示在最左边)
3⃣️左侧依次显示textLabel和detailTextLabel,不显示imageView
4⃣️左上方显示textLabel,左下方显示detailTextLabel,imageView可选(显示在最左边)
下面依次为四种风格示例:
代理方法、数据源方法
<UITableViewDelegate,UITableViewDataSource>
//有多少组(默认为1)
- (NSInteger)numberOfSectionsInTableView:(UITableView *)tableView{
return 5;
}
//每组显示多少行cell数据
- (NSInteger)tableView:(UITableView *)tableView numberOfRowsInSection:(NSInteger)section{
return 5;
}
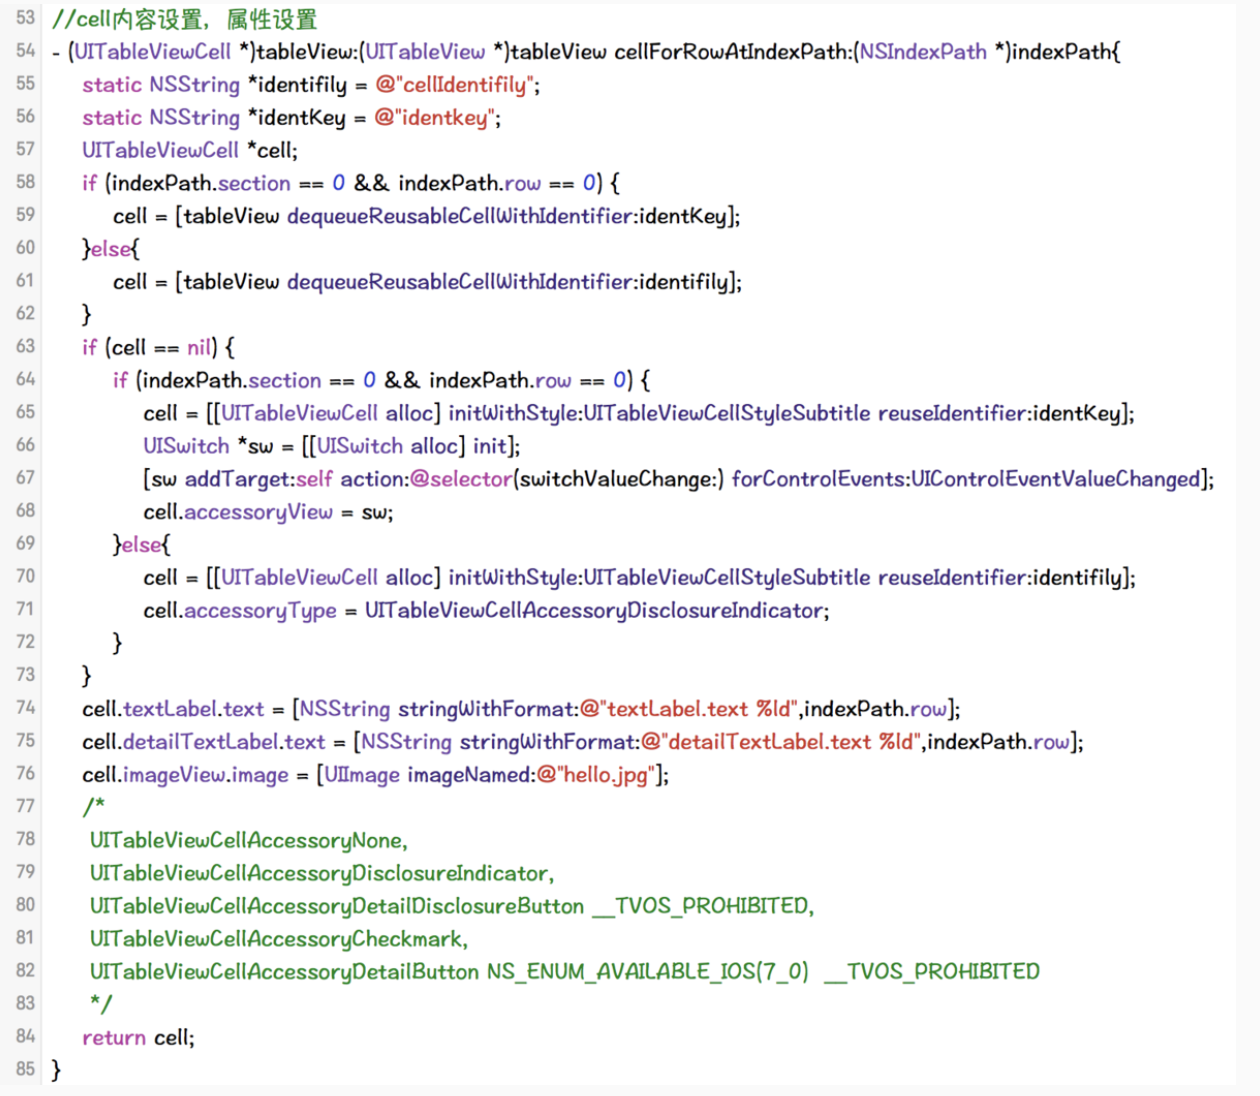
//cell内容设置,属性设置
- (UITableViewCell *)tableView:(UITableView *)tableView cellForRowAtIndexPath:(NSIndexPath *)indexPath{
static NSString *identifily = @"cellIdentifily";
UITableViewCell *cell = [tableView dequeueReusableCellWithIdentifier:identifily];
if (cell == nil) {
cell = [[UITableViewCell alloc] initWithStyle:UITableViewCellStyleValue2 reuseIdentifier:identifily];
}
cell.textLabel.text = [NSString stringWithFormat:@"textLabel.text %ld",indexPath.row];
cell.detailTextLabel.text = [NSString stringWithFormat:@"detailTextLabel.text %ld",indexPath.row];
cell.imageView.image = [UIImage imageNamed:@"hello.jpg"];
cell.imageView.frame = CGRectMake(10, 30, 30, 30);
NSLog(@"cellForRowAtIndexPath");
return cell;
}
//每个cell将要加载时调用
- (void)tableView:(UITableView *)tableView willDisplayCell:(UITableViewCell *)cell forRowAtIndexPath:(NSIndexPath *)indexPath{
NSLog(@"willDisplayCell");
}
//加载组头标题时调用
- (void)tableView:(UITableView *)tableView willDisplayHeaderView:(UIView *)view forSection:(NSInteger)sectio{
NSLog(@"willDisplayHeaderView");
}
//加载尾头标题时调用
- (void)tableView:(UITableView *)tableView willDisplayFooterView:(UIView *)view forSection:(NSInteger)section{
NSLog(@"willDisplayFooterView");
}
//滑动时,cell消失时调用
- (void)tableView:(UITableView *)tableView didEndDisplayingCell:(UITableViewCell *)cell forRowAtIndexPath:(NSIndexPath*)indexPath{
NSLog(@"didEndDisplayingCell");
}
//组头标题消失时调用
- (void)tableView:(UITableView *)tableView didEndDisplayingHeaderView:(UIView *)view forSection:(NSInteger)section{
NSLog(@"didEndDisplayingHeaderView");
}
//组尾标题消失时调用
- (void)tableView:(UITableView *)tableView didEndDisplayingFooterView:(UIView *)view forSection:(NSInteger)section{
NSLog(@"didEndDisplayingFooterView");
}
// Variable height support
//cell 的高度(每组可以不一样)
- (CGFloat)tableView:(UITableView *)tableView heightForRowAtIndexPath:(NSIndexPath *)indexPath{
return 70.f;
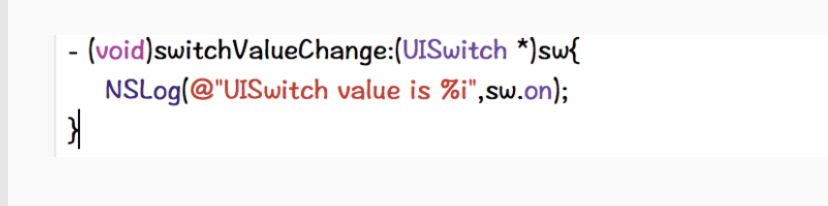
}
//group 风格的cell的组头部标题部分高度
- (CGFloat)tableView:(UITableView *)tableView heightForHeaderInSection:(NSInteger)section{
return 15.0f;
}
//group 风格的cell的尾部标题部分的高度
- (CGFloat)tableView:(UITableView *)tableView heightForFooterInSection:(NSInteger)section{
return 15.0f;
}
//返回组头标题
- (NSString *)tableView:(UITableView *)tableView titleForHeaderInSection:(NSInteger)section{
return [NSString stringWithFormat:@"headerGroup%ld",section];
}
//返回组尾标题
- (NSString *)tableView:(UITableView *)tableView titleForFooterInSection:(NSInteger)section{
return [NSString stringWithFormat:@"footerGroup%ld",section];
}- 点击cell时调用
- (void)tableView:(UITableView *)tableView didSelectRowAtIndexPath:(NSIndexPath *)indexPath;- 离开点击时调用
- (void)deselectRowAtIndexPath:(NSIndexPath *)indexPath animated:(BOOL)animated;[tableView deselectRowAtIndexPath:indexPath animated:YES];
即点击cell时cell有背景色,如过没有选中另一个,则这个cell背景色一直在,加入这句话效果是在点击结束后cell背景色消失。
- 离开选中状态时调用(即选中另一个cell时,第一个cell会调用它的这个方法)
- (void)tableView:(UITableView *)tableView didDeselectRowAtIndexPath:(NSIndexPath *)indexPath</pre>UITableViewCell里面的一些细节属性
- cell选中时的背景颜色(默认灰色,现在好像只有无色和灰色两种类型了)
@property (nonatomic) UITableViewCellSelectionStyle selectionStyle;
UITableViewCellSelectionStyleNone,
UITableViewCellSelectionStyleBlue,
UITableViewCellSelectionStyleGray,
UITableViewCellSelectionStyleDefault
- cell 右侧图标类型(图示)
@property (nonatomic) UITableViewCellAccessoryType accessoryType;
UITableViewCellAccessoryNone 默认无
UITableViewCellAccessoryDisclosureIndicator 有指示下级菜单图标
UITableViewCellAccessoryDetailDisclosureButton 有详情按钮和指示下级菜单图标
UITableViewCellAccessoryCheckmark 对号
UITableViewCellAccessoryDetailButton 详情按钮
- cell的另一个属性
@property (nonatomic, strong, nullable) UIView *accessoryView;
如需自定义某个右侧控件(支持任何UIView控件)如下图的第一组第一行的右侧控件(核心代码见下面)

UITableView的右侧索引
- 核心代码
返回每组标题索引
<pre>- (NSArray *)sectionIndexTitlesForTableView:(UITableView *)tableView{
NSMutableArray *indexs = [[NSMutableArray alloc] init];
for (int i = 0; i < kHeaderTitle.count; i++) {
[indexs addObject:kHeaderTitle[i]];
}
return indexs;
}
</pre>
自定义cell(MVC模式)
类似于下图这种每个cell不太一样。

1.建立模型,模型里面是数据类型
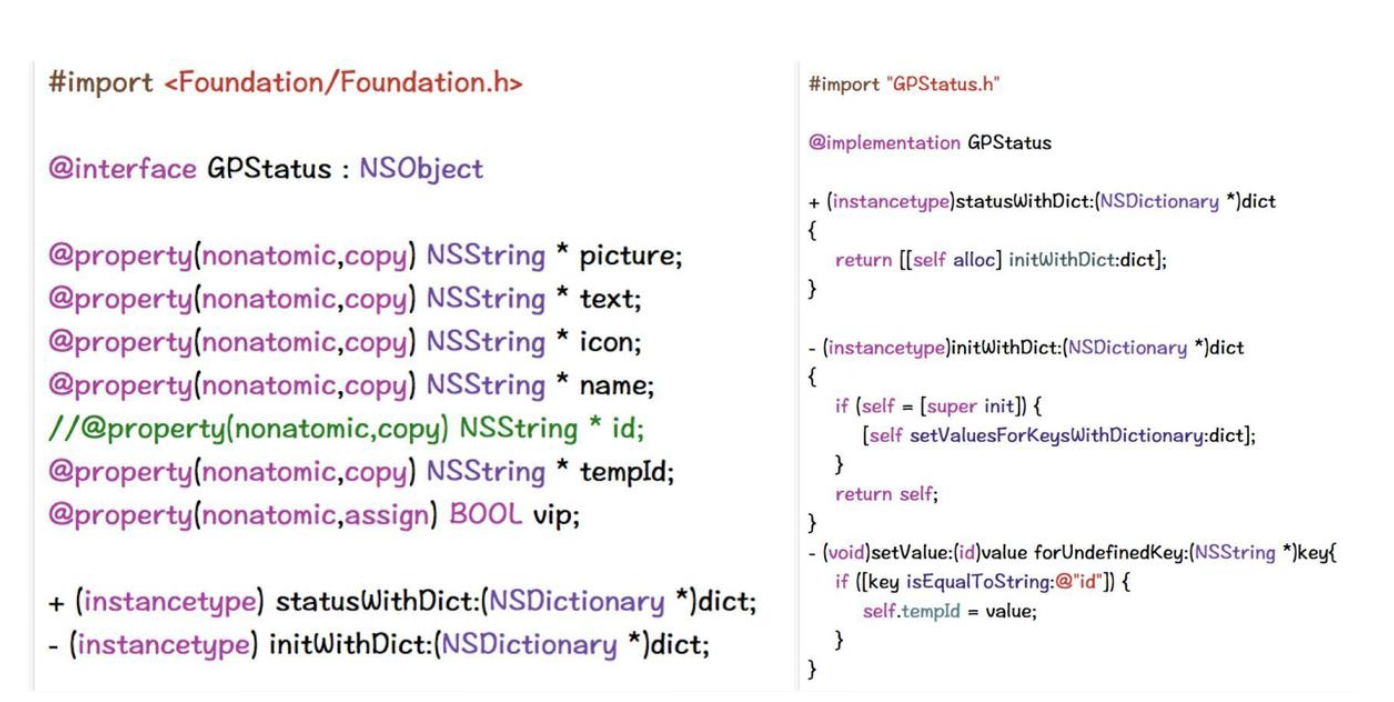
注意:如果.h文件中有类似于 id这种关键字的变量,要重新写一个变量,在.m文件中判断如果是这个变量,则用新写的变量接收原来变量的值。
2.cell 文件继承UITableViewCell(cell 可以纯代码,可以xib,一般xib比较方便点)
2.1 cell文件中声明一个模型类的变量
@property(nonatomic,strong)GPStatus * status;
2.2 写一个初始化的方法
+(instancetype)statusCellWithTableView:(UITableView *)tableView;
.m文件中初始化方法一般写如下代码
//注册 直接使用类名作为唯一标识

    NSString * Identifier = NSStringFromClass([self class]);

    UINib * nib = [UINib nibWithNibName:Identifier bundle:nil];

    [tableView registerNib:nib forCellReuseIdentifier:Identifier];
return [tableView dequeueReusableCellWithIdentifier:Identifier];
.m 文件中 模型类的set方法中设置数据
self.iconView.image = [UIImage imageNamed:self.status.icon];
self.pictureView.image = [UIImage imageNamed:self.status.picture];
self.textView.text = self.status.text;
self.nameView.text = self.status.name;
self.vipView.image = [UIImage imageNamed:@"vip"];cell = [[GPStatusCell alloc] initWithStyle:UITableViewCellStyleDefault reuseIdentifier:ID];
cell.status = self.statuses[indexPath.row];删除操作
一般这种Cell如果向左滑动右侧就会出现删除按钮直接删除就可以了。其实实现这个功能只要实现代理方法,只要实现了此方法向左滑动就会显示删除按钮。只要点击删除按钮这个方法就会调用。
-(void)tableView:(UITableView *)tableView commitEditingStyle:(UITableViewCellEditingStyle)editingStyle forRowAtIndexPath:(NSIndexPath *)indexPath;- (void)tableView:(UITableView *)tableView commitEditingStyle:(UITableViewCellEditingStyle)editingStyle forRowAtIndexPath:(NSIndexPath *)indexPath{
if (editingStyle == UITableViewCellEditingStyleDelete) {
[_titleArray removeObject:_titleArray[indexPath.row]];
[tableView deleteRowsAtIndexPaths:@[indexPath] withRowAnimation:UITableViewRowAnimationBottom];
}
}排序
- 进入编辑状态,实现下面这个方法就能排序
 - (void)btnClick{

    [_tableView setEditing:!_tableView.isEditing animated:YES];

}
- (void)tableView:(UITableView *)tableView moveRowAtIndexPath:(NSIndexPath *)sourceIndexPath toIndexPath:(NSIndexPath *)destinationIndexPath{
//更新数据源,保存排序后的结果
}
tableView下拉放大header上滑改变navigationBar颜色

简单介绍:
- 1.还是创建控制器,控制器里面创建tableView,初始化其必要的代理方法使能其正常显示
- 2.初始化tableView的时候让tableView向下偏移(偏移下来的那段放图片):
_tableView.contentInset = UIEdgeInsetsMake(backGroupHeight - 64, 0, 0, 0);- 3.初始化图片,注意图片的frame设置,加载在tableView上
imageBg = [[UIImageView alloc] initWithFrame:CGRectMake(0, -backGroupHeight, kDeviceWidth, backGroupHeight)];

imageBg.image = [UIImage imageNamed:@"bg_header.png"];

[_tableView addSubview:imageBg];- 4.根据滑动时的偏移量改变图片的frame,改变navigationBar的透明度
 - (void)scrollViewDidScroll:(UIScrollView *)scrollView{

    CGFloat yOffset = scrollView.contentOffset.y;

    CGFloat xOffset = (yOffset + backGroupHeight)/2;

if (yOffset < -backGroupHeight) {

        CGRect rect = imageBg.frame;

        rect.origin.y = yOffset;

        rect.size.height = -yOffset;

        rect.origin.x = xOffset;

        rect.size.width = kDeviceWidth + fabs(xOffset)*2;


        imageBg.frame = rect;

    }

    CGFloat alpha = (yOffset + backGroupHeight)/backGroupHeight;

    [self.navigationController.navigationBar setBackgroundImage:[self imageWithColor:[[UIColor orangeColor] colorWithAlphaComponent:alpha]] forBarMetrics:UIBarMetricsDefault];

    titleLb.textColor = [UIColor colorWithRed:255 green:255 blue:255 alpha:alpha];

}- 5.渲染navigationBar颜色方法
 - (UIImage *)imageWithColor:(UIColor *)color{
//描述矩形

    CGRect rect = CGRectMake(0.0f, 0.0f, 1.0f, 1.0f);
//开启位图上下文
UIGraphicsBeginImageContext(rect.size);
//获取位图上下文

    CGContextRef content = UIGraphicsGetCurrentContext();
//使用color演示填充上下文
CGContextSetFillColorWithColor(content, [color CGColor]);
//渲染上下文
CGContextFillRect(content, rect);
//从上下文中获取图片

    UIImage *currentImage = UIGraphicsGetImageFromCurrentImageContext();
//结束上下文
UIGraphicsEndImageContext();
return currentImage;

}链接:https://www.jianshu.com/p/a5f6c534695e
